Lets play around the Solaris virtualization technology by Oracle (SUN) known as Jumpstart - a network installation tool-set used by Solaris for virtualising the SPARC/x86 hardware for Solaris operating systems. Ever imagined on how to take OS snapshots for Solaris considering the fact that its mostly deployed on SPARC architecture ? How to remotely deploy Solaris OS over the network ? How to backup all the operating system data from one Solaris machine and deploy it over another machine ? How can we have an automated mechanism to do all the above steps ? Well Jumpstart is the answer to your questions.
Did you know there's something known as Kickstart for Linux based operating systems only ... to be discussed in future articles.For now lets jump back to Jumpstart ...
Why Jumpstart ?
} Simplifies - the way Solaris installations are done on 'N' machines
} Speed - Faster than the traditional manual method of CD-ROM installation
} Adminless - Allows unattended installation
} Replication - easily replicate systems across the organization/institution
Lets try to understand the Jumpstart scenario for Intel (x86) based machines.
Jumpstart consists of 2 main parts :
{ network booting of a system } and { network installation }
Ingredients for setting up Jumpstart on x86 based machines or VMware :
1. One Virtual Switch - helps create a private network on existing VMware setup
2. Two Solaris 10 machines on x86/vmware hardware (one server and one client)
- Server plays the role of DHCP server + Boot Server + Installation Server
- Client will boot from DHCP server and start the installation/clone deployment process
3. One NFS / HTTP / FTP machine to store captured data or FLAR files (optional but recommended to have a separate machine to store captured images)
Note : You don't want other machines on your VMware setup to boot from Jumpstart's DHCP server and mess up your critical environment, hence create a virtual switch to isolate your Jumpstart setup.
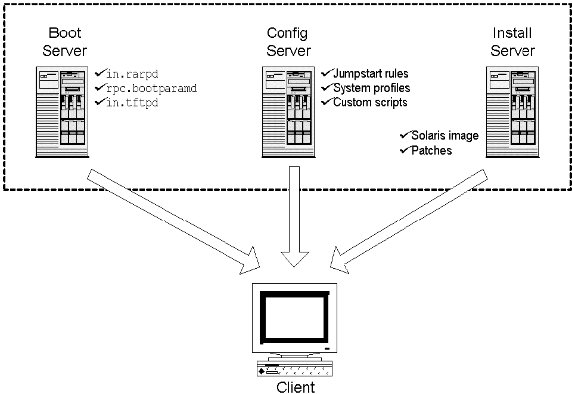
Here's a sample image of how your setup would look like ...
Setup two machines with Solaris 10. While installing Solaris 10 make sure that you select "Entire Group" option so that all packages are installed.
If you are using a virtual switch to isolate your environment you will need to setup a DNS server also using the DNS packages for Solaris.The DNS machine can be of any flavor windows or linux.
Consider the two machines as Server and Client.On the Server you need to follow the below steps :
1. Create install and configuration directories
2. Copy the solaris operating system media
3. Create sysidcfg file in install directory
Now export the NFS where the files are stored :
4. Create Profile and rules.ok file
creating the profile file :
creating the rules file :
Now run the "check" file to validate the profile and rules.ok file
5. Create /tftpboot
Also uncomment the line in /etc/inet/inetd.conf
6. Start system daemons
Restart the following daemons :
7. Configure the DHCP server
8. Add the IP of your client
9. Add the client to the JumpStart configuration
Add the client to the JumpStart configuration with the add_install_client script
available options :
-p : directory where the sysidcfg file resides
-d : specify as a DHCP client
-e : ethernet/MAC address
-c : directory where the rules.ok file resides
Create the following macro (the name contains the MAC address of the client) to enable the PXE boot, as mentioned in the output of the previous script :
10. Final touch
activate the tftp boot service
modify the vfstab
add_client script creates a menu.lst file , modify that to add the "-install dhcp" option
DONE ... now just reboot your client and wait until it boots from network
.
Did you know there's something known as Kickstart for Linux based operating systems only ... to be discussed in future articles.For now lets jump back to Jumpstart ...
Why Jumpstart ?
} Simplifies - the way Solaris installations are done on 'N' machines
} Speed - Faster than the traditional manual method of CD-ROM installation
} Adminless - Allows unattended installation
} Replication - easily replicate systems across the organization/institution
Lets try to understand the Jumpstart scenario for Intel (x86) based machines.
Jumpstart consists of 2 main parts :
{ network booting of a system } and { network installation }
Ingredients for setting up Jumpstart on x86 based machines or VMware :
1. One Virtual Switch - helps create a private network on existing VMware setup
2. Two Solaris 10 machines on x86/vmware hardware (one server and one client)
- Server plays the role of DHCP server + Boot Server + Installation Server
- Client will boot from DHCP server and start the installation/clone deployment process
3. One NFS / HTTP / FTP machine to store captured data or FLAR files (optional but recommended to have a separate machine to store captured images)
Note : You don't want other machines on your VMware setup to boot from Jumpstart's DHCP server and mess up your critical environment, hence create a virtual switch to isolate your Jumpstart setup.
Here's a sample image of how your setup would look like ...
Setup two machines with Solaris 10. While installing Solaris 10 make sure that you select "Entire Group" option so that all packages are installed.
If you are using a virtual switch to isolate your environment you will need to setup a DNS server also using the DNS packages for Solaris.The DNS machine can be of any flavor windows or linux.
Consider the two machines as Server and Client.On the Server you need to follow the below steps :
1. Create install and configuration directories
# mkdir –m 755 /export/jumpstart /export/jump_sol10
# chown root:root /export/jumpstart /export/jump_sol10
# cat /etc/dfs/dfstab share –F nfs –o ro,anon=0 /export/jumpstart share –F nfs –o ro,anon=0 /export/jump_sol10 ^D
# shareall
# chown root:root /export/jumpstart /export/jump_sol10
# cat /etc/dfs/dfstab share –F nfs –o ro,anon=0 /export/jumpstart share –F nfs –o ro,anon=0 /export/jump_sol10 ^D
# shareall
2. Copy the solaris operating system media
# mount -F hsfs -o ro /dev/dsk/c0t0d0s2 /mnt
# ls /mnt/
Copyright License boot
JDS-THIRDPARTYLICENSEREADME Solaris_10 installer
#
# mkdir /export/install
# cd /mnt/Solaris_10/Tools/
# ./setup_install_server /export/install/
Verifying target directory…
Calculating the required disk space for the Solaris_10 product
Calculating space required for the installation boot image
Copying the CD image to disk…
Copying Install Boot Image hierarchy…
Copying /boot netboot hierarchy…
Install Server setup complete
#
3. Create sysidcfg file in install directory
# mkdir /export/config
# vi /export/config/sysidcfg
system_locale=C
timezone=Europe/Madrid
terminal=vt100
keyboard=Spanish
security_policy=none
root_password=s0yZy.w98CEO6
timeserver=localhost
name_service=none
network_interface=nge0 { hostname=hostname_of_your_client
protocol_ipv6=no
netmask=255.255.255.0
default_route=10.164.5.254}
nfs4_domain=dynamic
#
Now export the NFS where the files are stored :
# more /etc/dfs/dfstab
# Place share(1M) commands here for automatic execution
# on entering init state 3.
#
# Issue the command ‘svcadm enable network/nfs/server’ to
# run the NFS daemon processes and the share commands, after adding
# the very first entry to this file.
#
# share [-F fstype] [ -o options] [-d ""] [resource]
# .e.g,
# share -F nfs -o rw=engineering -d “home dirs” /export/home2
share -F nfs -o ro /export/config
#
# shareall
#
# share
- /export/config ro “”
- /export/install ro,anon=0 “”
#
# Place share(1M) commands here for automatic execution
# on entering init state 3.
#
# Issue the command ‘svcadm enable network/nfs/server’ to
# run the NFS daemon processes and the share commands, after adding
# the very first entry to this file.
#
# share [-F fstype] [ -o options] [-d "
# .e.g,
# share -F nfs -o rw=engineering -d “home dirs” /export/home2
share -F nfs -o ro /export/config
#
# shareall
#
# share
- /export/config ro “”
- /export/install ro,anon=0 “”
#
4. Create Profile and rules.ok file
creating the profile file :
# cd /export/config/
# vi profile1
install_type initial_install
system_type standalone
cluster SUNWCXall
# format the entire disk for Solaris
fdisk all solaris all
# define how the disk is partitioned
partitioning explicit
filesys rootdisk.s0 6144 /
filesys rootdisk.s1 4096 swap
filesys rootdisk.s7 free /partition7
#
# vi profile1
install_type initial_install
system_type standalone
cluster SUNWCXall
# format the entire disk for Solaris
fdisk all solaris all
# define how the disk is partitioned
partitioning explicit
filesys rootdisk.s0 6144 /
filesys rootdisk.s1 4096 swap
filesys rootdisk.s7 free /partition7
#
creating the rules file :
# cd /export/config
#
# vi rules
hostname hostname_of_your_client – profile1 -
#
#
# vi rules
hostname hostname_of_your_client – profile1 -
#
Now run the "check" file to validate the profile and rules.ok file
# cd /export/config/
# cp /export/install/Solaris_10/Misc/jumpstart_sample/check /export/config/
# ls -l
total 130
-r-xr-xr-x 1 root root 63082 Sep 14 17:19 check
-rw-r–r– 1 root root 364 Sep 14 17:12 profile1
-rw-r–r– 1 root root 30 Sep 14 17:08 rules
-rw-r–r– 1 root root 289 Sep 14 17:05 sysidcfg
# ./check
Validating rules…
Validating profile profile1…
The custom JumpStart configuration is ok.
# ls -l
total 132
xr-xr-x 1 root root 63082 Sep 14 17:19 check
-rw-r–r– 1 root root 364 Sep 14 17:12 profile1
-rw-r–r– 1 root root 30 Sep 14 17:08 rules
-rw-r–r– 1 root root 56 Sep 14 17:19 rules.ok
-rw-r–r– 1 root root 289 Sep 14 17:05 sysidcfg
# more rules.ok
hostname hostname_of_your_client – profile1 -
# version=2 checksum=2581
#
5. Create /tftpboot
# mkdir –m 711 /tftpboot
# chown root:root /tftpboot
# chown root:root /tftpboot
Also uncomment the line in /etc/inet/inetd.conf
#tftp … /usr/sbin/in.tftpd in.tftpd -s /tftpboot
6. Start system daemons
Restart the following daemons :
NFS daemons
in.rarpd
rpc.bootparamd
inetd
in.rarpd
rpc.bootparamd
inetd
7. Configure the DHCP server
# dhcpconfig -D -r SUNWfiles -p /var/dhcp
Created DHCP configuration file.
Created dhcptab.
Added “Locale” macro to dhcptab.
Added server macro to dhcptab – galdospr.
DHCP server started.
# svcs -p dhcp-server
STATE STIME FMRI
online 18:30:39 svc:/network/dhcp-server:default
18:30:39 7687 in.dhcpd
# dhcpconfig -N 10.164.5.0 -t 10.164.5.254
Added network macro to dhcptab – 10.164.5.0.
Created network table.
#
8. Add the IP of your client
# pntadm -A 10.164.5.13 -c hostname_of_your_client -f DYNAMIC -m 10.164.5.0 -y -s IP_OF_YOUR_SERVER
#
#
9. Add the client to the JumpStart configuration
Add the client to the JumpStart configuration with the add_install_client script
available options :
-p : directory where the sysidcfg file resides
-d : specify as a DHCP client
-e : ethernet/MAC address
-c : directory where the rules.ok file resides
# cd /export/install/Solaris_10/Tools/
# ./add_install_client -d -c YOUR_SERVER_IP:/export/config -p YOUR_SERVER_IP:/export/config -e YOUR_CLIENTS_MAC_ADDRESS i86pc
Adding “share -F nfs -o ro,anon=0 /export/install” to /etc/dfs/dfstab
copying boot file to /tftpboot/pxegrub.I86PC.Solaris_10-1
If not already configured, enable PXE boot by creating
a macro named 0100E0815F2C07 with:
Boot server IP (BootSrvA) : YOUR_SERVER_IP
Boot file (BootFile) : 0100E0815F2C07
#
Create the following macro (the name contains the MAC address of the client) to enable the PXE boot, as mentioned in the output of the previous script :
# dhtadm -A -m 0100E0815F2C07 -d ‘:BootFile=0100E0815F2C07:BootSrvA=YOUR_SERVER_IP:’
#
#
10. Final touch
activate the tftp boot service
# svcs ‘*tftp*’
STATE STIME FMRI
online 18:16:15 svc:/network/tftp/udp6:default
#
STATE STIME FMRI
online 18:16:15 svc:/network/tftp/udp6:default
#
modify the vfstab
# grep tftp /etc/vfstab
/export/install/boot – /tftpboot/I86PC.Solaris_10-1 lofs – yes ro
#
/export/install/boot – /tftpboot/I86PC.Solaris_10-1 lofs – yes ro
#
add_client script creates a menu.lst file , modify that to add the "-install dhcp" option
# more /tftpboot/menu.lst.01080027701392
default=0
timeout=30
title Solaris_10 Jumpstart
kernel /I86PC.Solaris_10-1/multiboot kernel/unix – install dhcp -B install_config=YOUR_CLIENT_IP:/e
xport/config,sysid_config=YOUR_CLIENT_IP:/export/config,install_media=YOUR_CLIENT_IP:/export/install
module /I86PC.Solaris_10-1/x86.miniroot
#
default=0
timeout=30
title Solaris_10 Jumpstart
kernel /I86PC.Solaris_10-1/multiboot kernel/unix – install dhcp -B install_config=YOUR_CLIENT_IP:/e
xport/config,sysid_config=YOUR_CLIENT_IP:/export/config,install_media=YOUR_CLIENT_IP:/export/install
module /I86PC.Solaris_10-1/x86.miniroot
#
DONE ... now just reboot your client and wait until it boots from network
.


 known as Jumpstart - a network installation tool-set used by Solaris...)
0 comments:
Post a Comment